
Last Saturday I put a few minutes effort into setting up a photo with my friends Jeff & Rivka. The photo was taken in the midst of other things that needed to get done. I took the photo quick and dirty. Then I spent an embarrassingly long time tinkering with it in Photoshop until it was pretty much exactly what I had in mind in the first place.
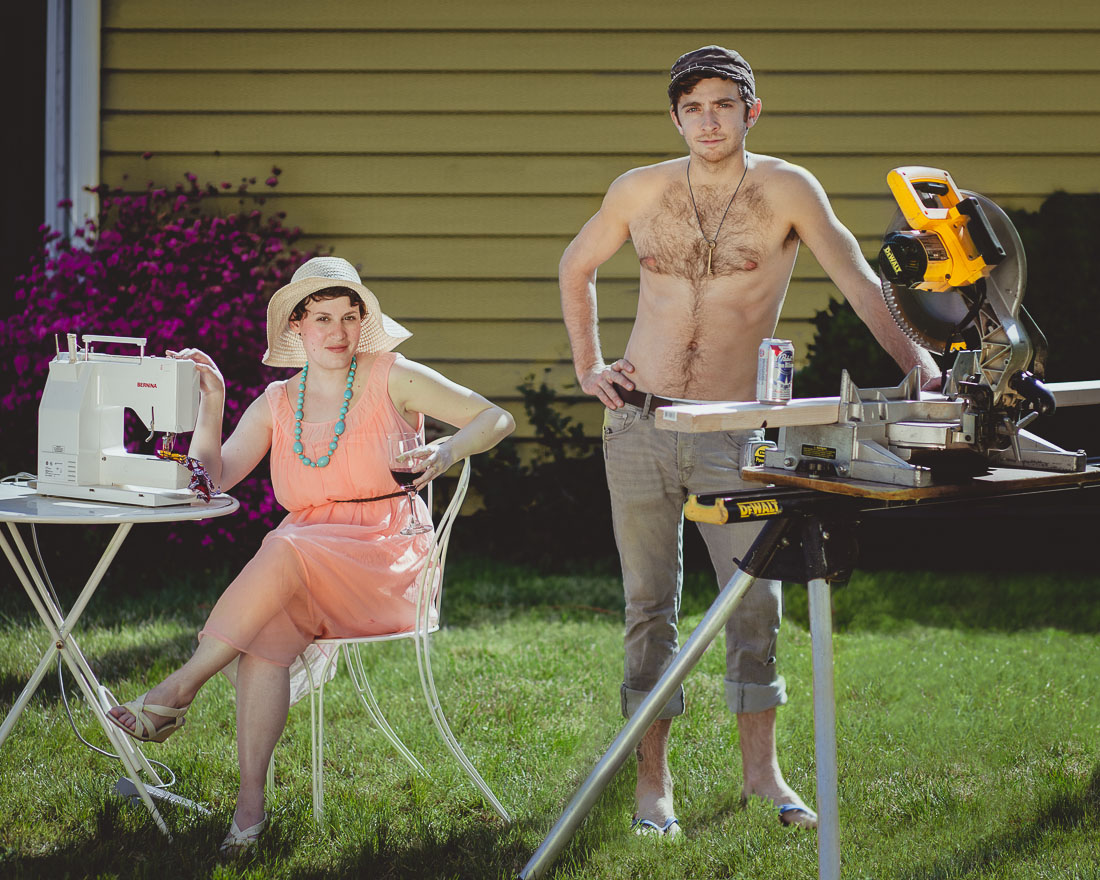
Lit with the sun and two large, gold reflectors.
As a photographer, I advocate capturing images that need as little alteration as possible. But as a creative person, I like that I can go anywhere I want after the image has been captured. I think that’s why I spent so much time grooming this image. Just to see where I would go if I didn’t have any compromises. It was rewarding, and I feel like I’ve meaningfully improved a part of my skill set.
So, having been queued into the fact that this image has been heavily altered, you’ve probably already begun to comb over the image looking for the give aways, and by now you’ve probably already spotted a few of them. Still, I submit it wouldn’t have been so obvious if I hadn’t told you. Here’s a look at what I started with:

~
The first thing to happen was a fancy little straighten/align correction in the Lightroom. I also tweaked my base exposure and white balance. Then, Jef’s face seemed a bit too stern, so I grabbed his head and shoulders from another image and blended them into the original.
Then, the board in front needed to be removed. It was a pain in the butt. I started by going into a few images I had captured while test firing to collect Jeff’s lower legs, as well as enough grass to fill the space the board was currently occupying.
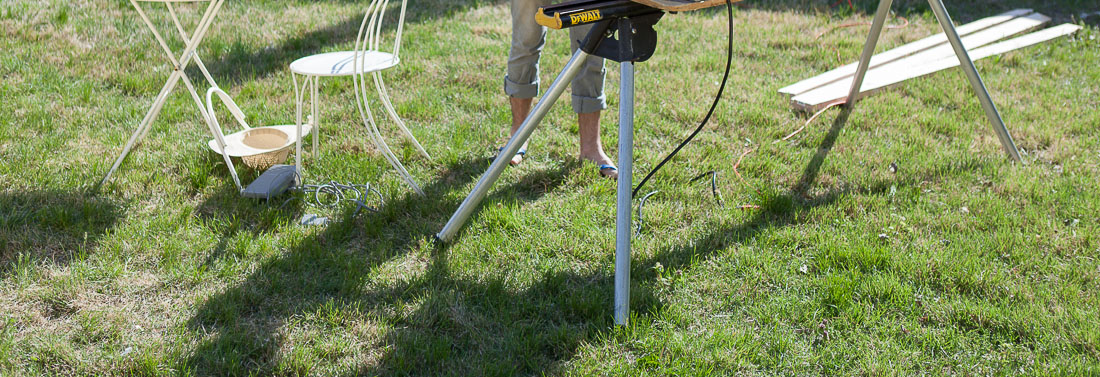
Left Leg
Right Leg
Grass: I cloned out all the non-grass objects and blended the shadows so that I had a uniform block of grass. Then I deleted the file, so you’ll just have to imagine it.
Dealing with the board in front was tedious. The substitute grass I had available also posed a challenge because it was in sharper focus than the grass in the original image. It was also seen from a different angle. I overcame the problem by using a hybrid of grass from a different image, and carefully selected grass from the original image. I also used a lens blur effect on the substitute grass so that it better matched the original image’s aperture. Finally, I masked out the brown spots in the grass, and shifted them to a green hue.
Fixing the wall in the back was also tedious, but in a different way. The wall in the original photo was uneven in places, even after applying some straightening mojo. So, using a small patch of the wall that I liked, I created a new wall and masked it to overlap and blend with the original. Because of this, to change the color, I carefully masked a few adjustment layers dealing only with the wall. If you don’t know what any of that is, that’s okay, I’m not sure why I’m writing it. So it kind of evens out.
The bokeh leaves in the foreground were also solved by a handful of carefully placed adjustment layers.
The final stages dealt with a few tweaks here and there to highlights and shadows, and the physique of the image.There were also some more adjustments to tint, and a little special sauce. The final color tones, cropping and vignette were applied in Lightroom. Then I uploaded them and wrote about it here.
Anyway, that’s it for this week. Over the weekend, I’m going to take some photos with gold reflectors. We’ll see where that takes us. Maybe I’ll have some of that to share on Monday or Tuesday.
Recent Discussion